Menu

Get the Look: Vintage Bride
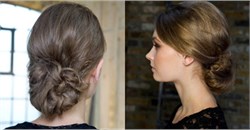
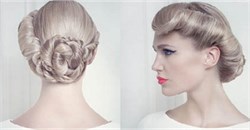
What better way to kick off our celebration of all things bridal, than with the first in a series of brilliant step by steps, courtesy of one of our favourite bridal specialists, Annette Bradford. Here Annette takes you through the vintage bride look that will leave brides feeling amazing on their big day.
Step by step:
1. Firstly, ask your client to wash their hair beforehand with a clarifying shampoo, to get the hair back to its natural state. Condition.
2. Take a section of hair at the front and curl using tongs or a straightener. Loop the section and pin in place. Repeat along the hair. It’s a good idea to spray each section with a heat protection spray to protect and hold the style.
TIP: Spray each section with Wella Thermal Image to protect and hold
3. Tie the section at the nape, leaving space underneath to place the updo roll. Spray the hair with hairspray to help hold the updo roll in place.
4. Next, backcomb the ponytail softly using a comb.
5. Clip the updo roll beneath the ponytail, smooth the hair and pin the ends under the roll, creating a chignon.
6. Once cooled, release the section above, backcomb and pin into the chignon.
7. Work your way up through the sections, gently combing and twisting and pinning into place.
TIP: When placing the hair, go with the natural direction of the hair; this will look much nicer than hair that is forced into place.
8. Once the curls are in place, use a dressing out comb to fix any strays and spray with hairspray to smooth.

What you will need:-
Hair by Annette Bradford, Elegance Bridal Coiffure
Website: www.elegancebridalcoiffure.co.uk
Facebook: Elegance Bridal Coiffure
Twitter: @BridalCoiffure
Photography
Carla Stillman Photography
Dress
JC Brides
New & Trending
NEW
Delivery
Collection
Please login to your account to check stock in your local store.
NEW
Delivery
Collection
Please login to your account to check stock in your local store.
OFFER
NEW
Delivery
Collection
Please login to your account to check stock in your local store.
3 FOR £10
NEW
Delivery
Collection
Please login to your account to check stock in your local store.
OFFER
NEW
Delivery
Collection
Please login to your account to check stock in your local store.
3 FOR £10
NEW
Delivery
Collection
Please login to your account to check stock in your local store.
OFFER
NEW
Delivery
Collection
Please login to your account to check stock in your local store.
3 FOR £10
Freelance Focus
Freelance Focus, is a one stop resource for anyone working as a freelancer or thinking of going freelance in the hair & beauty industry, which includes a FREE downloadable guide filled with advice, useful insights, experiences and tips (from experienced freelancers) to help you understand the steps needed to make the right choices for you.
Back to Posts
Tags
- 2024
- acne
- allergies
- apps
- autumn
- awards
- balayage
- blonde
- braids
- bridal
- brows
- business
- capital & me
- care
- career
- celebrities
- christmas
- chrome
- clean
- collection
- color wow
- colour
- colours
- conditioner
- covid-19
- crazy color
- curls
- facial
- fanola
- fashion
- festival
- finance
- floral
- freelance
- gel
- gellux
- get the look
- goldwell
- halloween
- indola
- interview
- k18
- lashes
- lob
- loreal
- loyalty
- make up
- manicure
- marketing
- mens
- mental health
- microblading
- milk_shake
- nail art
- nailart
- nails
- new years
- nioxin
- nxt
- olaplex
- opi
- party
- pedicure
- ponytail
- pulp riot
- redken
- retail
- revlon
- salon revamp
- salon system
- schwarzkopf
- self-employed
- shampoo
- skincare
- smoothing
- social media
- split-ends
- spring
- step by step
- summer
- sustainability
- tanning
- the manicure company
- the met gala
- tigi
- tiktok
- toner
- toning
- top knot
- trends
- tutorial
- updo
- valentines
- veganuary
- wahl
- waxing
- wella
- wellbeing
- winter
Latest Posts
- Trend Alert: Muted Shades With Goldwell
- The Best Christmas Gifting Products For Your Salon
- Jenna Ortega: Get The Look
- Spook-tacular Nail Designs for Halloween: Get Ready to Enchant Your Clients!
- Why We’re Falling for Pumpkin Spice Hair Colour
- London Fashion Week SS25 Show Report
- Nail the Magic: OPI X Wicked
- Beetlejuice Nails
- milk_shake: icy blond & silver shine
- milk_shake: make my day
Related Posts
Top 3 Wedding Hair Trends 2024
Summer’s here and your bridal clients are getting ready for their big day! Check out some of our favourite bridal styles for summer 2024.
To Have And To Hold
Today's modern bride doesn't want conformist styles and traditional bridal looks - what she wants for her big day is a unique style that treads the line between on-trend and timeless, between elegant and effortless-looking. Here Westrow's Steve Rowbottom shares his thoughts on modern bridal trends.
Bridal Styling: Romantic Updo
Curls are often a favourite amongst brides and bridesmaids as they are soft, romantic, and frame the face beautifully but there’s an art to working them into an updo in a way that looks just right and doesn’t fall out or flatten as soon as the bad weather hits.
Wedding hair: The boho bride
The talented bridal specialist Annette Bradford tells us how to achieve two types of boho bridal styles.
Bridal hair with a touch of romance
The Triple Pony Bun is a look that’s romantic, sensual and sophisticated. With just the right hint of volume, it’s a beautiful bridal style for brides with longer hair. Here we share the steps, created by Percy & Reed’s Paul Percival, for BaByliss PRO.
Why we've fallen in love with this Revlon collection
It’s #weddingwednesday, which makes it the perfect time for us to indulge in this beautifully elegant selection of images from the Revlon Yes, I Do Collection.
Not your average bride
No longer is there a 'one look suits all' approach to bridal hair and beauty. For some women, their big day is more about expressing their own inimitable individuality, from the shoes on their feet, to how they style their hair. We spoke to the woman behind this alternative bridal collection, Annette Bradford, owner of Elegance Bridal Coiffure, in Waterlooville
